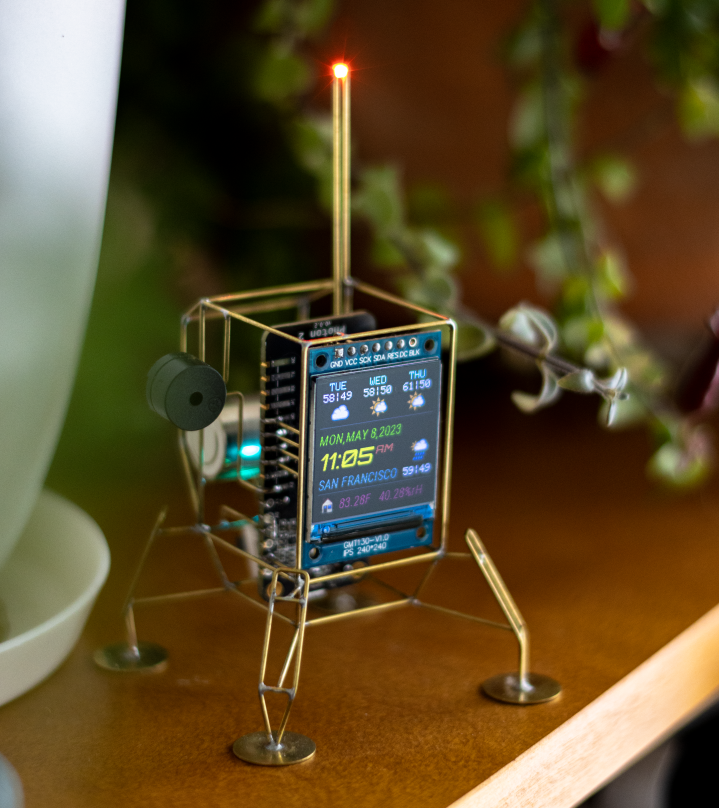
Photon 2 Lander
Last updated: 24 Sept, 2023
When we first launched the Photon 2 here at Particle, I was super excited about the possibility of using it in one of my circuit sculptures. It is by far the fastest little Wi-Fi IoT board that we have offered running at 200Mhz with dual band Wi-Fi and BLE. It also has a ton of onboard memory making it an ideal candidate for projects involving displays.
I have previously built a sculpture in the lander formfactor with a Particle Xenon (based on the nordic semi's nRF52840) called the GSC-X1, but I wanted to experiment with building one with the Photon 2 and a higher resolution IPS display. I love how it turned out in the end!
Please understand that this is not a step-by-step tutorial, but rather a documentation of how I went about building the lander. There are an infinite number of ways in which one can go about building something like this – based on their skill set, available resources, desired aesthetics, etc. I encourage you to use this documentation as a reference guide to help you come up with your own version, rather than trying to replicate it as is.
(*some of the product links include Amazon affiliate links)
Parts list
- Particle Photon 2
- 1.3” 240×240 IPS TFT ST7789 display
- SHT31 sensor breakout board, or your favorite sensor
- 14250 Li-Ion battery
- Electromagnetic Buzzer
- 20 AWG brass or copper rods for the frame
- 14mm brass discs for the landing pads
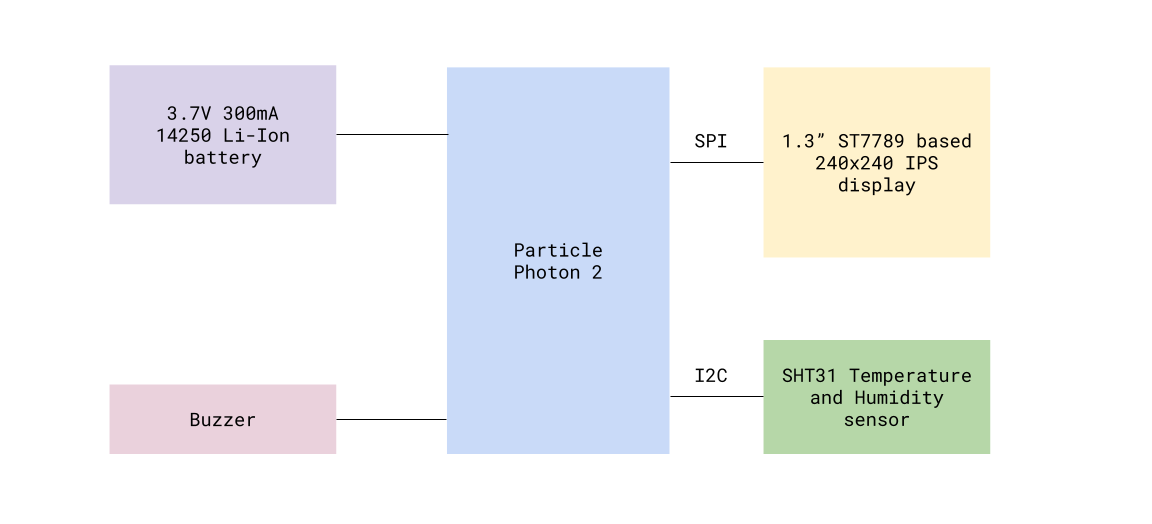
Block diagram
Controller
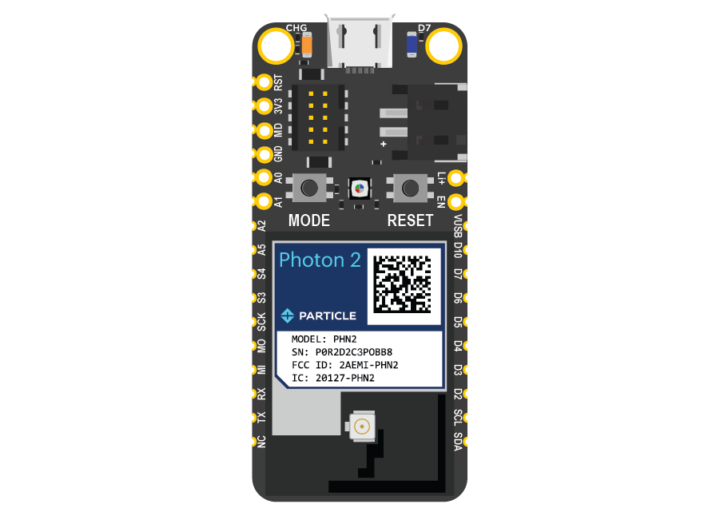
At the heart of this sculpture is the Particle Photon 2, which is Particle’s latest (as of 2023) Wi-Fi IoT devkit in a Feather form-factor. It comes preinstalled with the Particle Device OS and it provides connectivity to the internet over Wi-Fi. It also comes pre-bundled with Particle Cloud access and it is free for your first 100 devices.
The Photon 2 is based on the Realtek RTL8721 SoC with dual band Wi-Fi and BLE 5. The onboard MCU is ARM Cortex M33 running at 200Mhz. There is onboard 2 MB FLASH and 3 MB RAM.
Developing on the Photon 2 is very similar to working with Arduino, ESP32, or the RP4020 based boards. You’ll however need to use the Particle Workbench to write, compile, and upload your code instead of the Arduino IDE. If you are not interested in using a Particle device or it isn’t available where you live, you can always adapt this project to use a different MCU board. ESP32 or the RP4020 based boards are good alternatives. You’ll need to modify the code to work with them.
Display
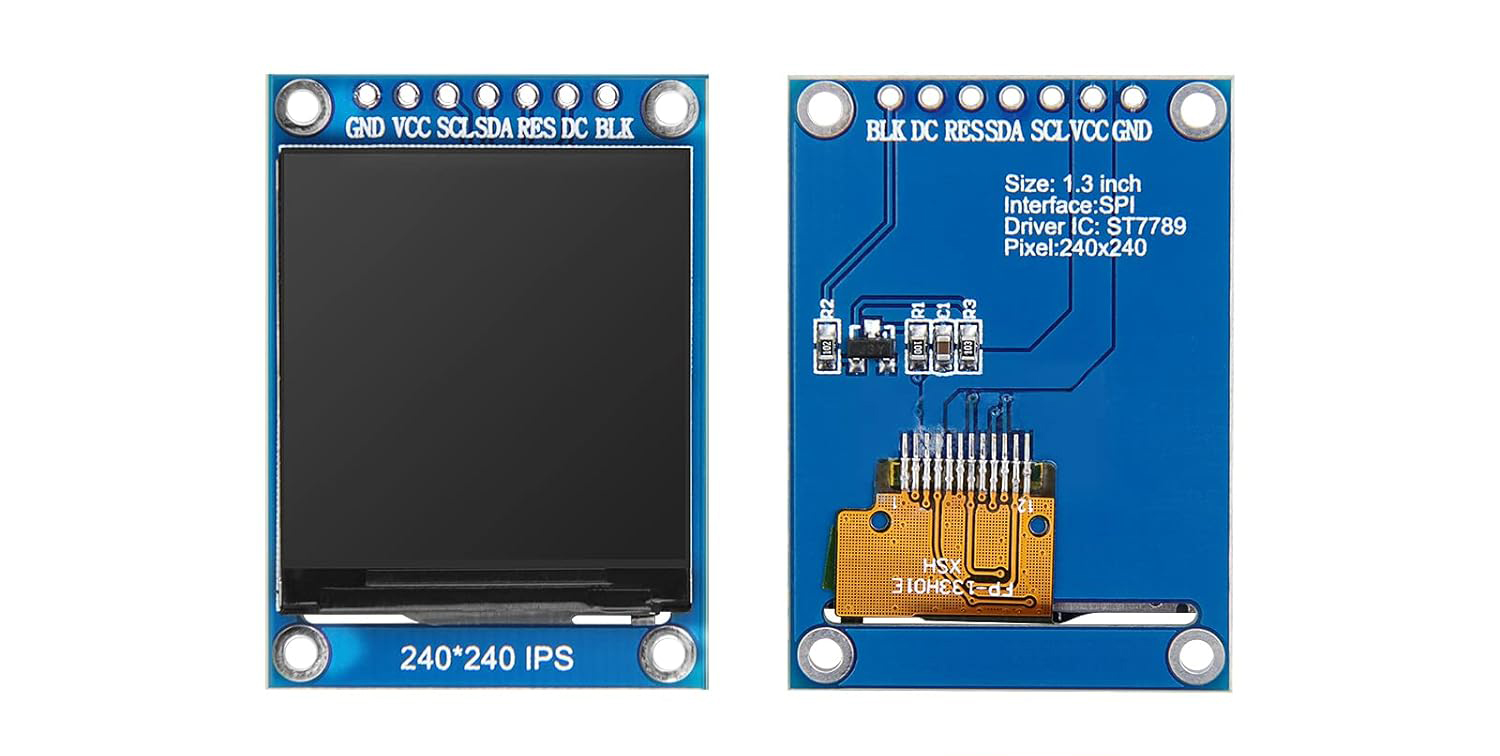
I’m using a 1.3” 240×240 16-bit full color IPS TFT display based on the ST7789 controller. This display has a really good viewing angle and the images appear very crisp. The display is widely available and comes in various sizes and pixel density. These work at 3.3V and communicate over SPI. There are a couple of good open source drivers for them available. Both Adafruit’s ST7735 or Bodmer’s TFT_eSPI work well. I’m using Adafruit’s library for this project.
Sensor
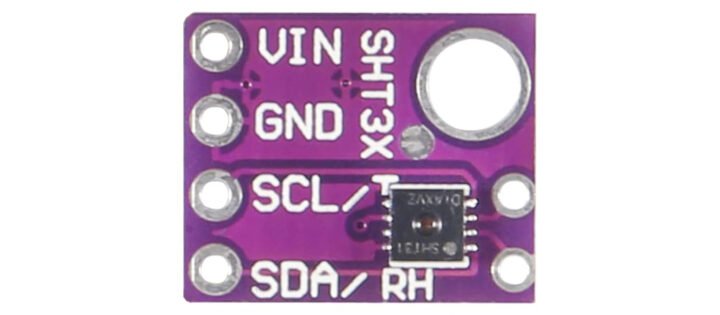
I made a small breakout board for the SHT31 temperature and humidity sensor. You can use other off-the-shelf breakout boards for this sensor as shown above or use a completely different sensor, like the BME280.
Buzzer
I'm using an electromagnetic passive buzzer to play simple tunes. I had a few laying around so I don't have a specific part number for them, but I've included a link in the parts list section of something similar.
Power
Use these batteries with extreme caution. Improper use can result in fire.
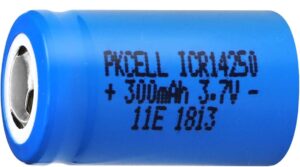
The sculpture is primarily powered by a 3.7V 300mAh 14250 sized (sometimes called ½ AAA) Li-Ion battery. The Photon 2 has a built-in Li-Ion battery charger, so the battery is directly connected to its +Li pin. The battery is charged by simply powering the Photon 2 over USB.
These batteries also do not have any protection circuit on them which means if there is an accidental short circuit, it will result in thermal runaway. If you are uncomfortable with working with these batteries just use USB for power or use a folded LiPo battery with build-in protection like this one.
Schematic
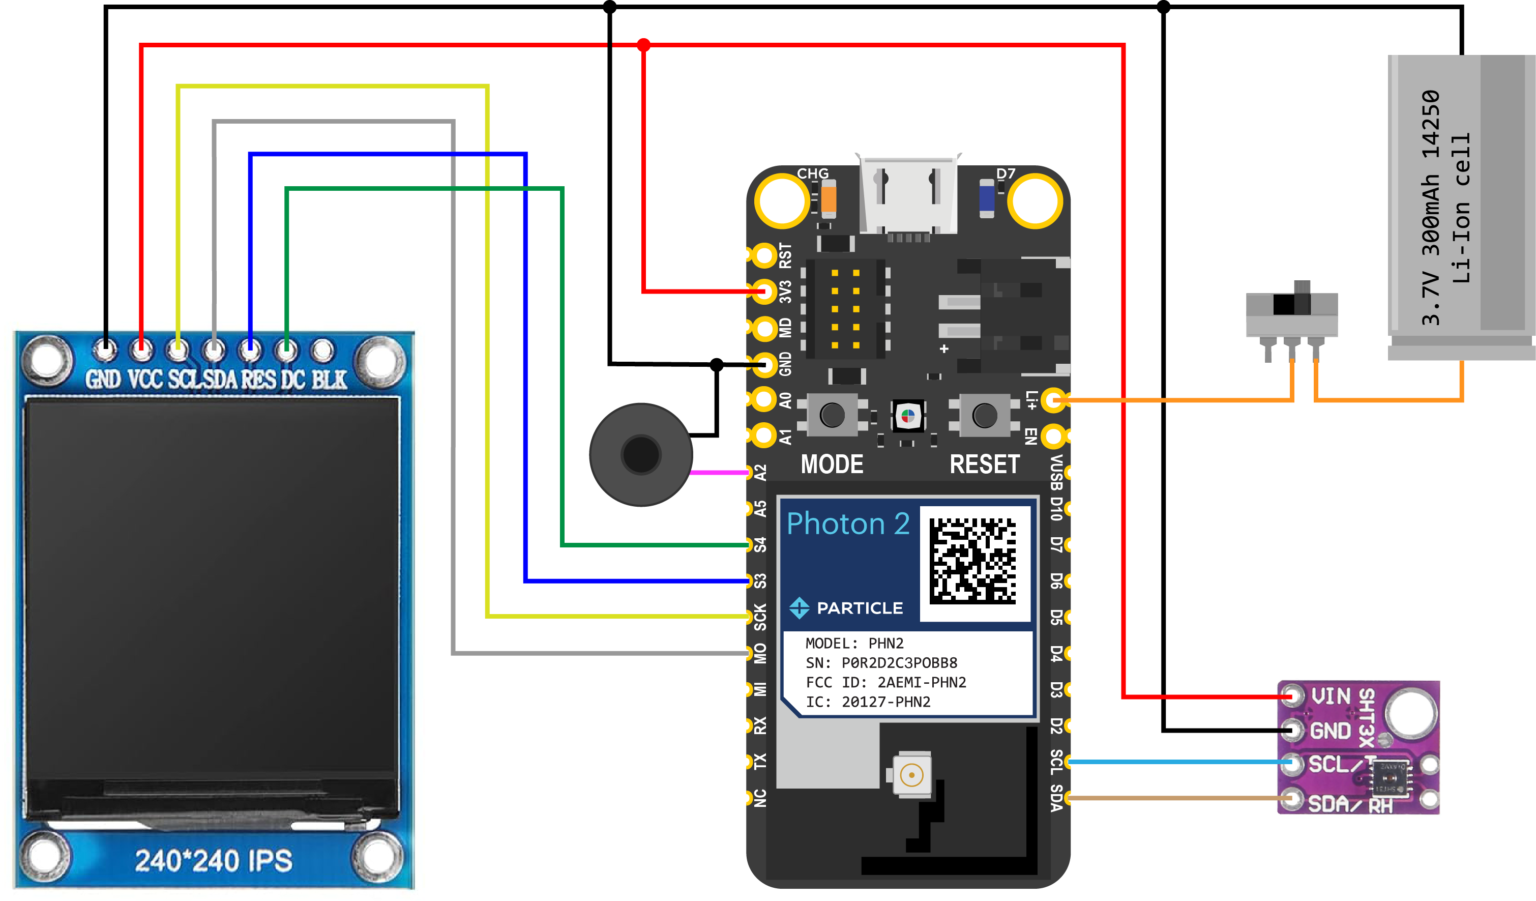
Pin connections
The display pin names suggests that it connects to the (SCL/SDA) I2C pins, but that is incorrect, and it actually connects to the SPI port. I’m not sure why the manufacturers decided to name it like that.
Display GND – Photon 2 GND
Display VCC – Photon 2 3V3
Display SCL – Photon 2 SCK
Display SDA – Photon 2 MOSI
Display RES – Photon 2 S3
Display DC – Photon 2 S4
Display BLK – Leave unconnected

The sensor board has built-in pull up resistors on the SDA and SCL pins. If yours does not have that, please add 4.7K pull up resistors on SDA and SCL pins separately.

Sensor VIN – Photon 2 3V3
Sensor GND – Photon 2 GND
Sensor SCL – Photon 2 SCL
Sensor SDA – Photon 2 SDA

Buzzer Positive - Photon 2 A2
Buzzer GND - Photon 2 GND

Battery positive – Photon 2 Li+ pin (via a switch)
Battery GND – Photon 2 GND
Construction
(TODO: Add detailed construction steps)
Firmware
A lot of the heavy lifting is done by Adafruit’s device libraries. They put out a ton of really amazing open source device libraries and hardware. Please consider supporting them by purchasing their products! I’m using the Adafruit ST7735 and GFX libraries for the display, and the SHT31 library for the sensor.
Complete source code for this project can be found on my GitHub.
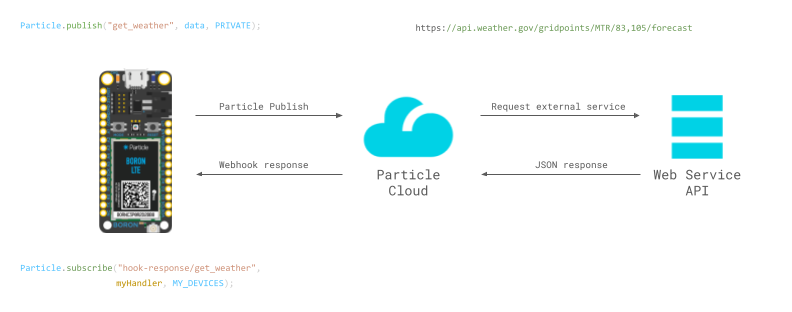
In addition to downloading the firmware on to your device, you’ll also need to setup the Particle Webhook integrations on the Particle console to fetch the weather forecast data.
Setting up Particle Webhooks
You can find the complete documentation on Particle Webhooks here.
Essentially Particle Webhook allows you to connect your Particle device to different services on the internet. In this project we are relying on the Webhooks to fetch and parse the weather forecast and sunrise/sunset times and sent it back to our device. Everytime we do a Particle publish, we trigger the associated Webhook which in turn returns us a nicely parsed data string. We fetch this data by subscribing to the associated webhook response. All of this magic happens asynchronously in the background and you do not need to actively manage it!
If all of this sounds confusing or overwhelming to you, don’t worry! You can follow some of the documentation on the Particle’s website or join the online community to find answers.
Setting up a webhook to fetch weather forecast data
Goto to Integrations in your Particle Console. Click on +ADD NEW INTEGRATIONS.
We will be using the weather.gov’s free API service to fetch the weather forecast data. You will have to adjust the URL with grid points for your location. It is currently set to fetch weather for San Francisco.
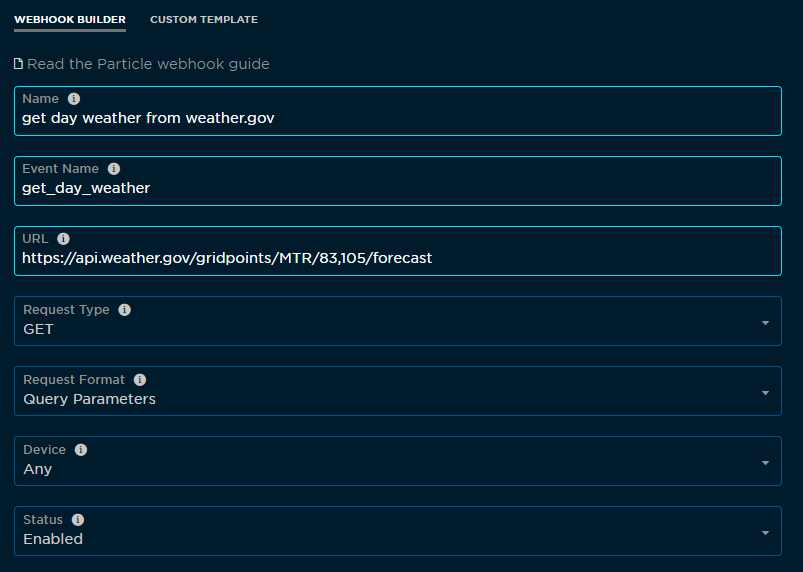
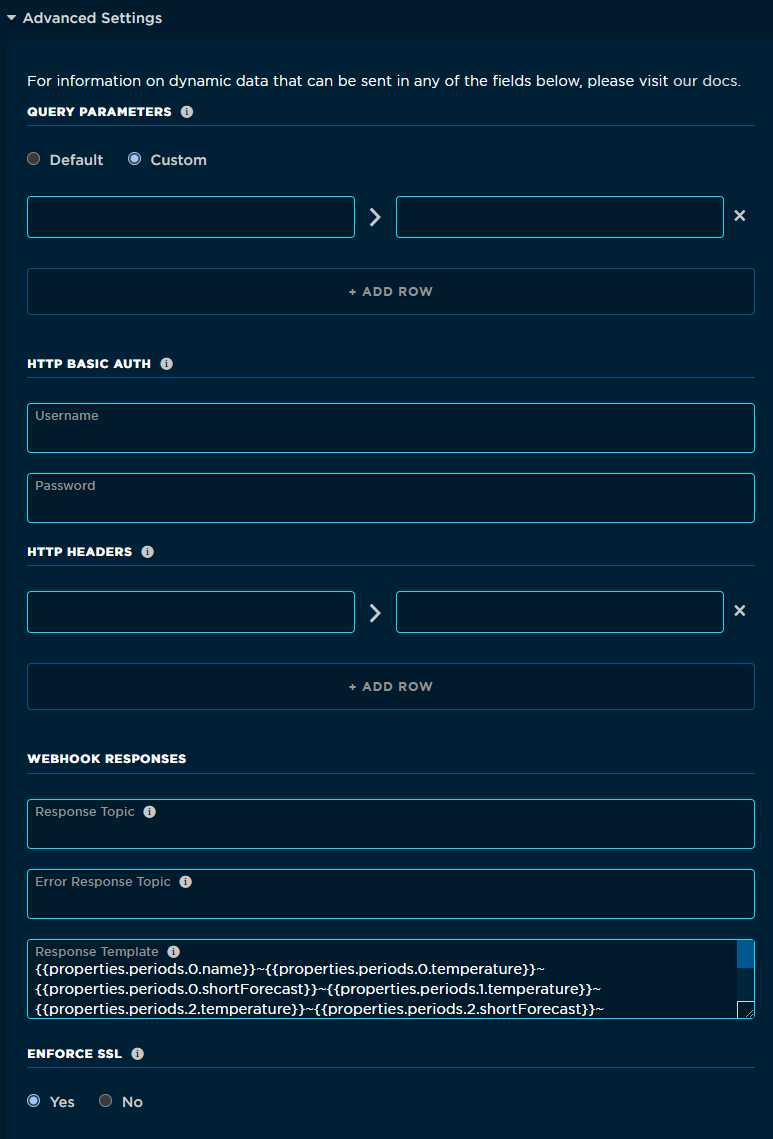
Create a webhook template to parse the relevant information:
{{properties.periods.0.name}}~{{properties.periods.0.temperature}}~{{properties.periods.0.shortForecast}}~{{properties.periods.1.temperature}}~{{properties.periods.2.temperature}}~{{properties.periods.2.shortForecast}}~{{properties.periods.3.temperature}}~{{properties.periods.4.temperature}}~{{properties.periods.4.shortForecast}}~{{properties.periods.5.temperature}}~{{properties.periods.6.temperature}}~{{properties.periods.6.shortForecast}}~{{properties.periods.7.temperature}}~
Hit save and your weather Webhook should now be all set.
If you found this documentation useful, please consider supporting me on Patreon or Ko-fi. Thank you!